How to Set Up Meta Catalog Ads (Dynamic Product Ads), Step by Step
 Nikolett Lorincz9 min read
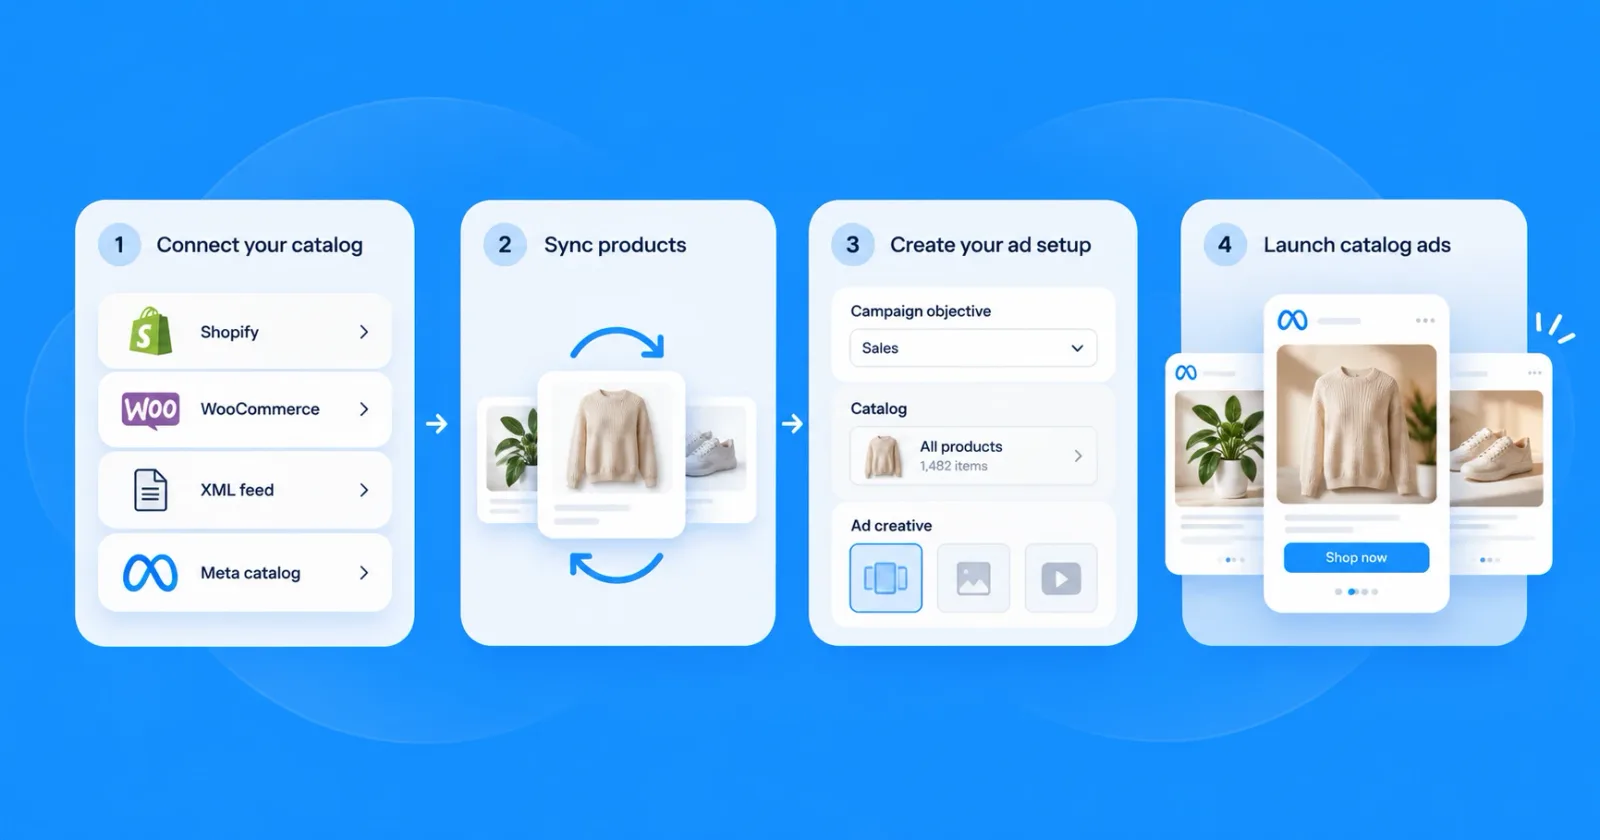
You uploaded your products, launched the campaign, and the ads show random items instead of the ones people looked at. Usually one step went wrong: the product IDs your pixel sends don't match the IDs in your catalog, so Meta can't tell which product someone viewed.
Get the setup right, and one campaign can advertise every product you sell, to new and returning buyers alike.
This guide takes you through it in seven steps, from the catalog in Commerce Manager to your first sales campaign. Start with what you need before step 1.
Before you start: what you need
Catalog ads, also called dynamic product ads (DPA), are ads Meta builds from your product catalog. Meta's developer documentation lists three things to have ready: a Facebook Page, an ad account with a payment method and a catalog.
In practice, check these five before step 1:
- A Business Portfolio (formerly Business Manager) that owns your Page, ad account and catalog.
- A Facebook Page for the store, and an Instagram account linked to it if you want Instagram placements.
- An ad account with a payment method.
- Admin access to your store, so you can install an app, add a feed or edit the site's code.
- Product data you trust: prices, stock and images that match what the store shows today.
Step 1: Create a catalog in Commerce Manager
Catalogs live in Commerce Manager, which replaced the older Facebook Catalog Manager. Create a new catalog there, pick the ecommerce type and select the Business Portfolio that should own it. If you sell through Shopify or another supported platform, you can let the platform create the catalog for you in step 2.
Keep to one catalog for the store unless you have a reason to split it. Meta's catalog guidance recommends a single catalog for better ad performance, and a second catalog means a second set of IDs to keep in sync.
Step 2: Add your products
Meta gives you several ways to fill the catalog. Pick the one that keeps prices and stock up to date with the least manual work.
| Method | How it works | Best for |
|---|---|---|
| Platform integration | Your store syncs products to the catalog automatically | Shopify, WooCommerce, BigCommerce and other supported platforms |
| Scheduled feed | Meta fetches a feed file from a URL on a schedule you set | Custom stores, or a feed tool you already use |
| Feed file upload | You upload a CSV, TSV, XML or Google Sheets file once | Testing, or a catalog that rarely changes |
| Manual | You add each item in a form | A handful of products |
Shopify
Install Meta's Facebook & Instagram app from the Shopify App Store. It syncs your eligible products to a Meta catalog and sets up the pixel, so steps 1 to 3 happen in one place.
In the app's data sharing settings, the Enhanced and Maximum levels also send events through the Conversions API. Choose one of those unless you have a privacy reason not to.
WooCommerce
Use the Meta for WooCommerce plugin from WordPress.org, published by Facebook and formerly called Facebook for WooCommerce. It syncs the catalog and installs the pixel, and WooCommerce's documentation says the Conversions API is integrated out of the box. The plugin is no longer listed on WooCommerce.com, so install it from WordPress.org.
BigCommerce
BigCommerce's own Meta app is no longer available. BigCommerce now points stores to Feedonomics Surface to connect the store to Meta, which keeps the catalog in sync without manual exports.
Required product fields
Every product needs nine fields, and Meta's catalog specification warns that if any are "missing or formatted incorrectly, products may not upload". The rules that trip stores up most often:
| Field | What Meta expects |
|---|---|
| id | Unique per item, up to 100 characters; Meta suggests the SKU |
| title | Up to 200 characters, but Meta recommends 65 or fewer so it isn't cut off |
| description | Plain text, no HTML, no links, not all capitals |
| availability | in stock or out of stock |
| condition | new, refurbished or used |
| price | A number, a space and the currency code, such as 29.99 USD; no currency symbols |
| link | The product page, on your own website's domain |
| image_link | JPEG or PNG, at least 500 × 500 pixels, up to 8 MB |
| brand | The brand name; Meta needs at least one of brand, GTIN or MPN |
Step 3: Connect the Meta Pixel and the Conversions API
Catalog ads learn from what people do on your site, so your store has to report it. Three standard events carry the product IDs: ViewContent on a product page, AddToCart and Purchase.
Meta's Pixel reference marks the product parameter as required for catalog ads on all three: content_ids or contents on ViewContent and Purchase, and contents on AddToCart. Without it, Meta sees a page view but not which product it was.
On a product page, the event looks like this, with the same ID the product has in your catalog:
fbq('track', 'ViewContent', {
  content_ids: ['SKU-1042'],
  content_type: 'product'
});
Platform apps send these events for you; the code matters when you check a custom store or a theme that was edited by hand.
Meta recommends running the Conversions API alongside the pixel for better ad performance. When the same event arrives through both, it needs the same event name and the same event ID, so Meta counts it once.
Can you create the catalog before the pixel?
Yes. A catalog can exist, and even hold all your products, before any pixel is installed. It just can't power retargeting yet, and you have no match rate to check until events start arriving with product IDs.
Step 4: Check that your events match your catalog
This is the step most guides skip, and a mismatch here quietly breaks retargeting. The ID your pixel sends for a product must be exactly the id of that product in the catalog.
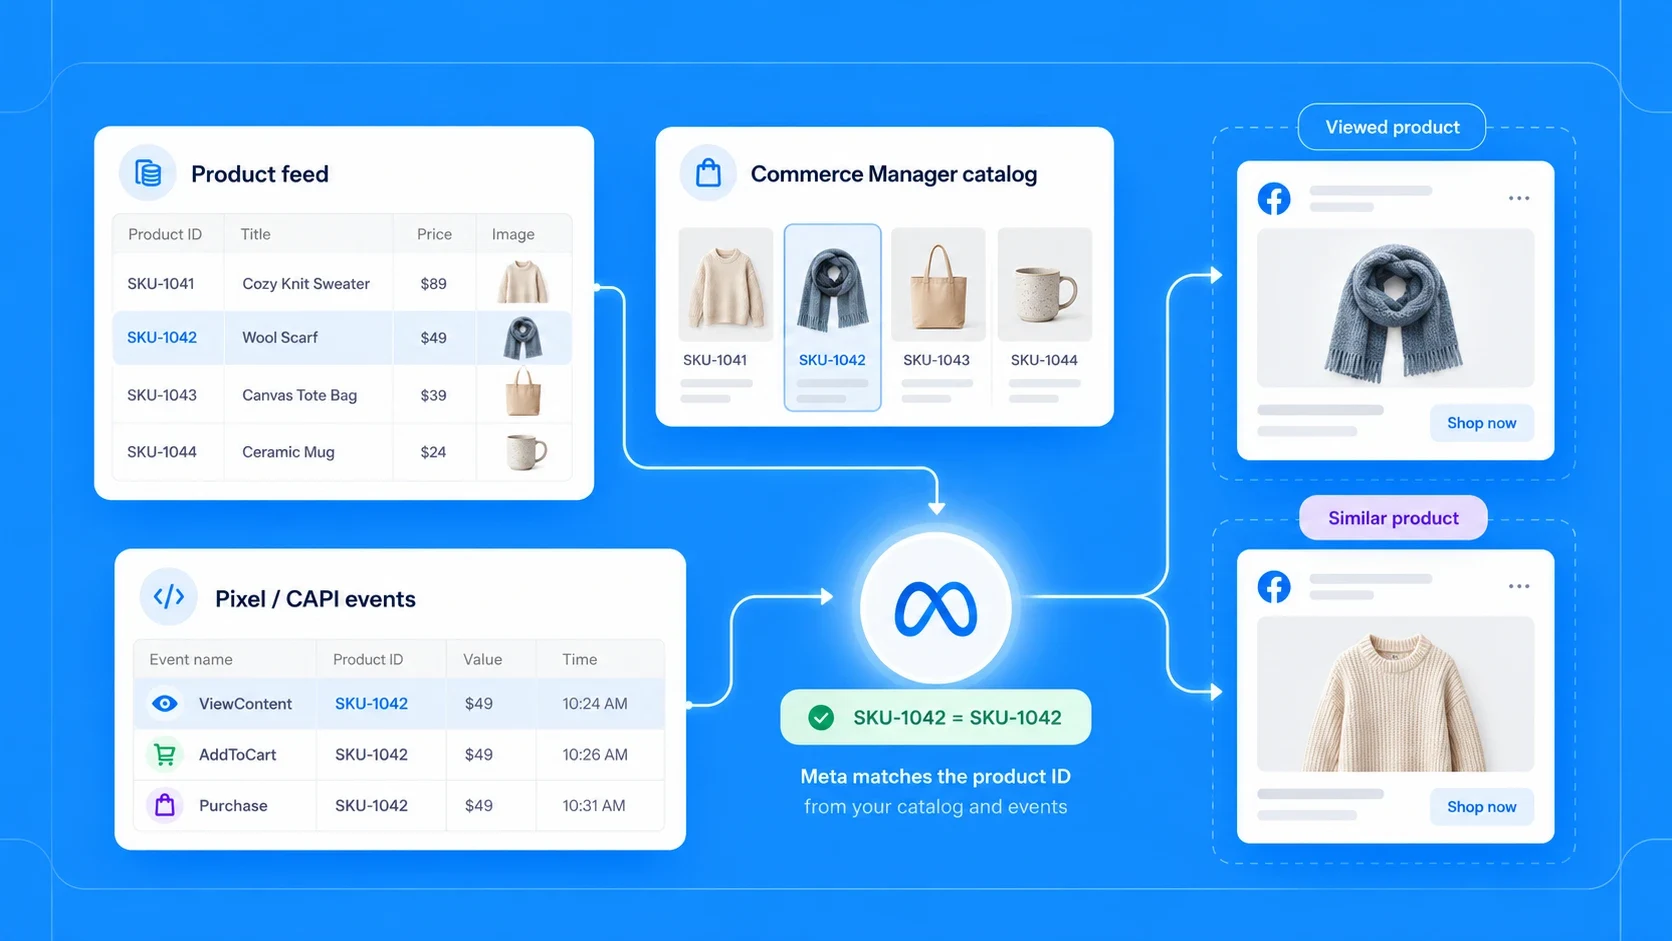
Meta's own advice is to "maintain a high match rate" between your events and your catalog. In Commerce Manager, the Events page of your catalog shows a catalog match rate for each dataset, the pixel or Conversions API connection that sends your events:

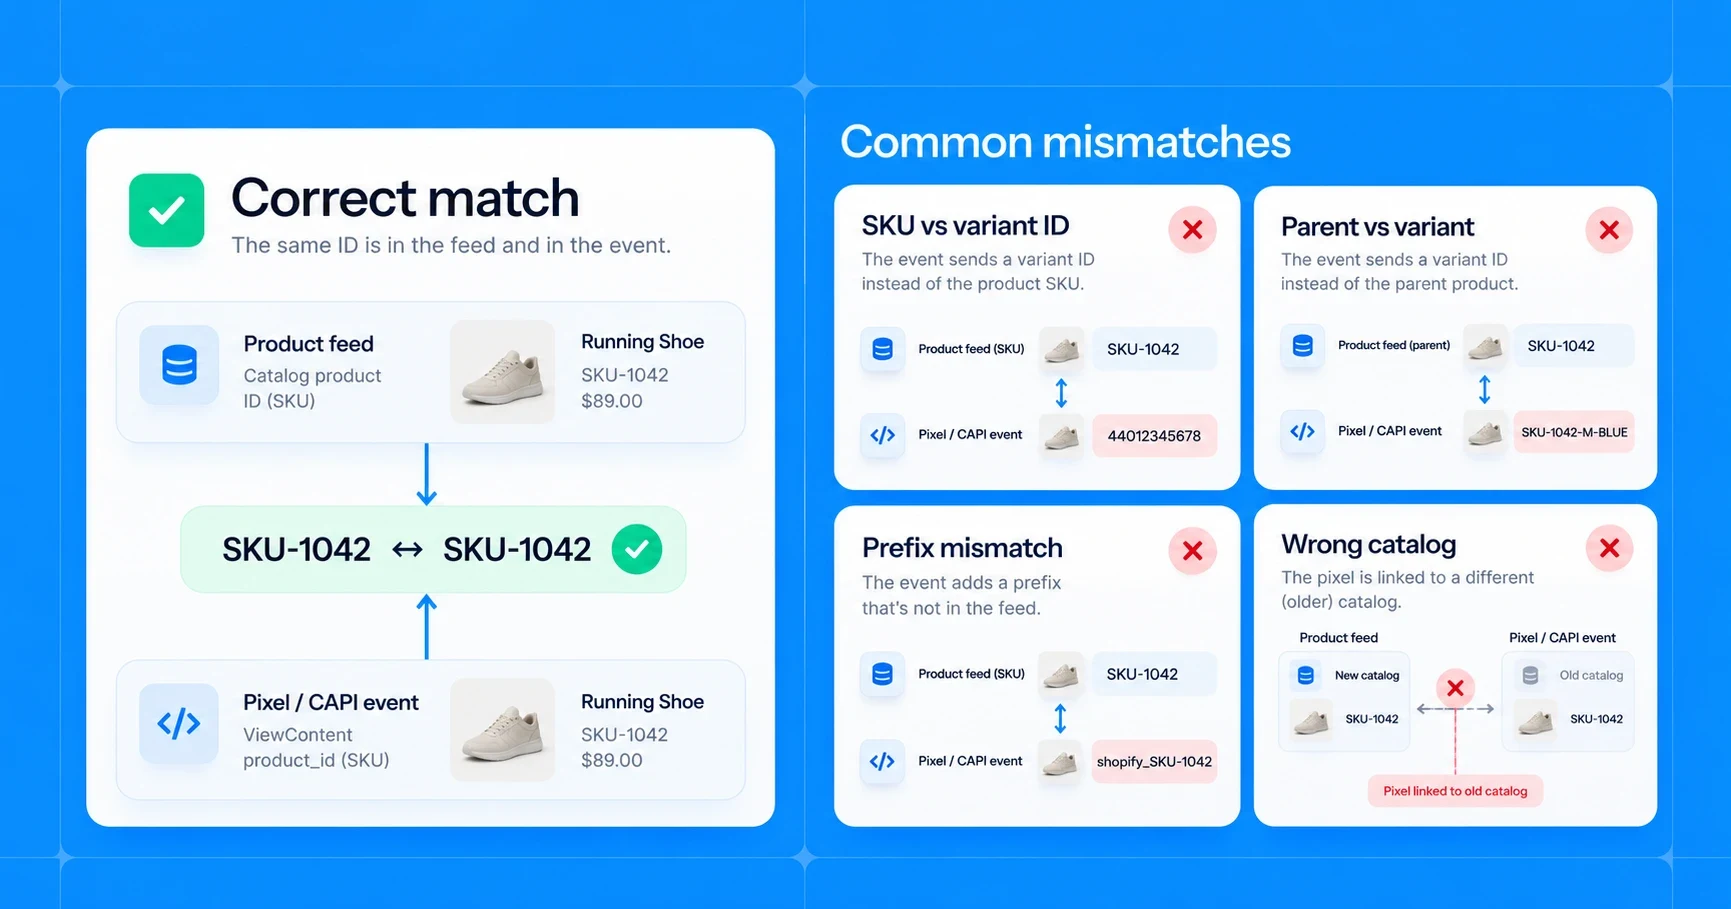
If the number is low, check these first:
- SKU vs variant ID. The pixel sends the SKU and the feed holds the variant ID, or the other way round.
- Parent vs variant. The product page reports the parent product, while the catalog lists each size and color as its own item, or the other way round.
- Prefixes and formatting. One side adds a prefix such as
shopify_, or the IDs differ in leading zeros or capital letters. - A second catalog. The pixel is connected to an old catalog, not the one the campaign uses.
To test it, open one product page, find its ViewContent event in the Test events tool in Events Manager, and search the catalog for the ID it sent. If the search finds the product, that product matches.
Step 5: Create product sets
A product set is a filtered part of your catalog, and each ad chooses which set it promotes. Create sets in Commerce Manager with filters such as category, brand, price or a custom label from your feed. If you use Meta's Shopify app, your Shopify collections also show up as sets.
Useful first sets:
- Bestsellers, to put most of the budget behind products that already sell.
- Sale items, for promo weeks, with their own creative.
- New arrivals, which have no sales history yet and need a separate budget to get seen.
- High-margin products, if your feed carries a margin or custom label.
A set that filters out every product won't deliver, so check the item count after each change to its filters.
Step 6: Create the sales campaign
In Ads Manager, create a campaign with the Sales objective. Meta's guidance is to "select your catalog under Product data when setting up your campaign": you connect it once, at the campaign level.
Meta has also changed what this is called. Its catalog ads page now calls the former Advantage+ catalog ads "Products from your catalog", and says your catalog works across all sales campaigns, not just one ad format. What changed, and what Meta now automates, gets its own guide: Meta Advantage+ catalog ads explained.
Two decisions come next:
- Audience. In a sales campaign, Meta shows catalog products both to people who viewed or added them to their cart and to people who have never visited. If you want a fixed budget for retargeting, run it as its own campaign with an audience of recent product viewers.
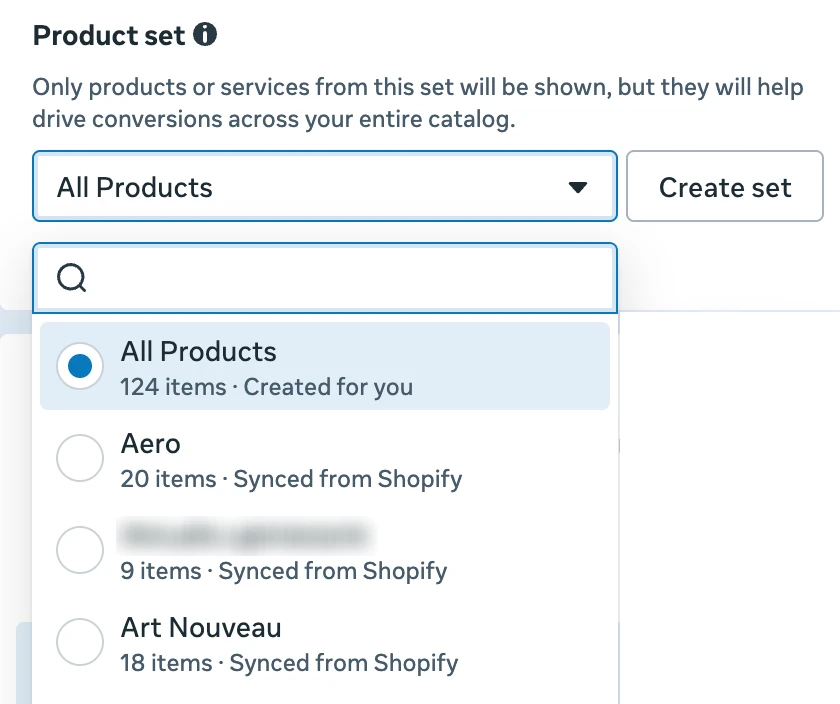
- Product set. In the ad, the Product set menu starts at All Products; pick the set from step 5 instead. In Meta's words, "only products or services from this set will be shown, but they will help drive conversions across your entire catalog."
Step 7: Set up the ad creative
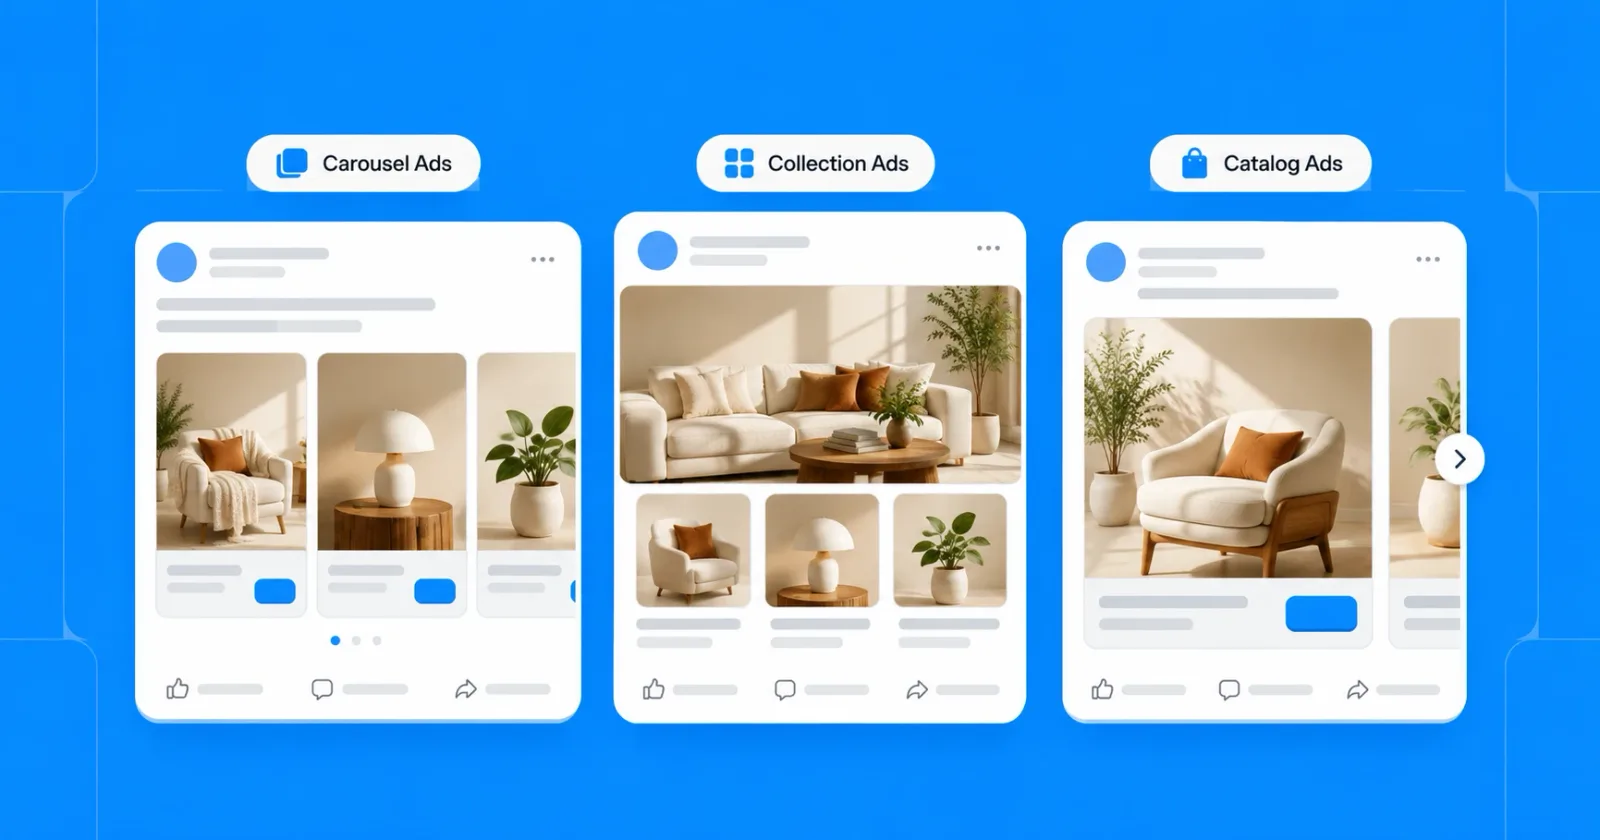
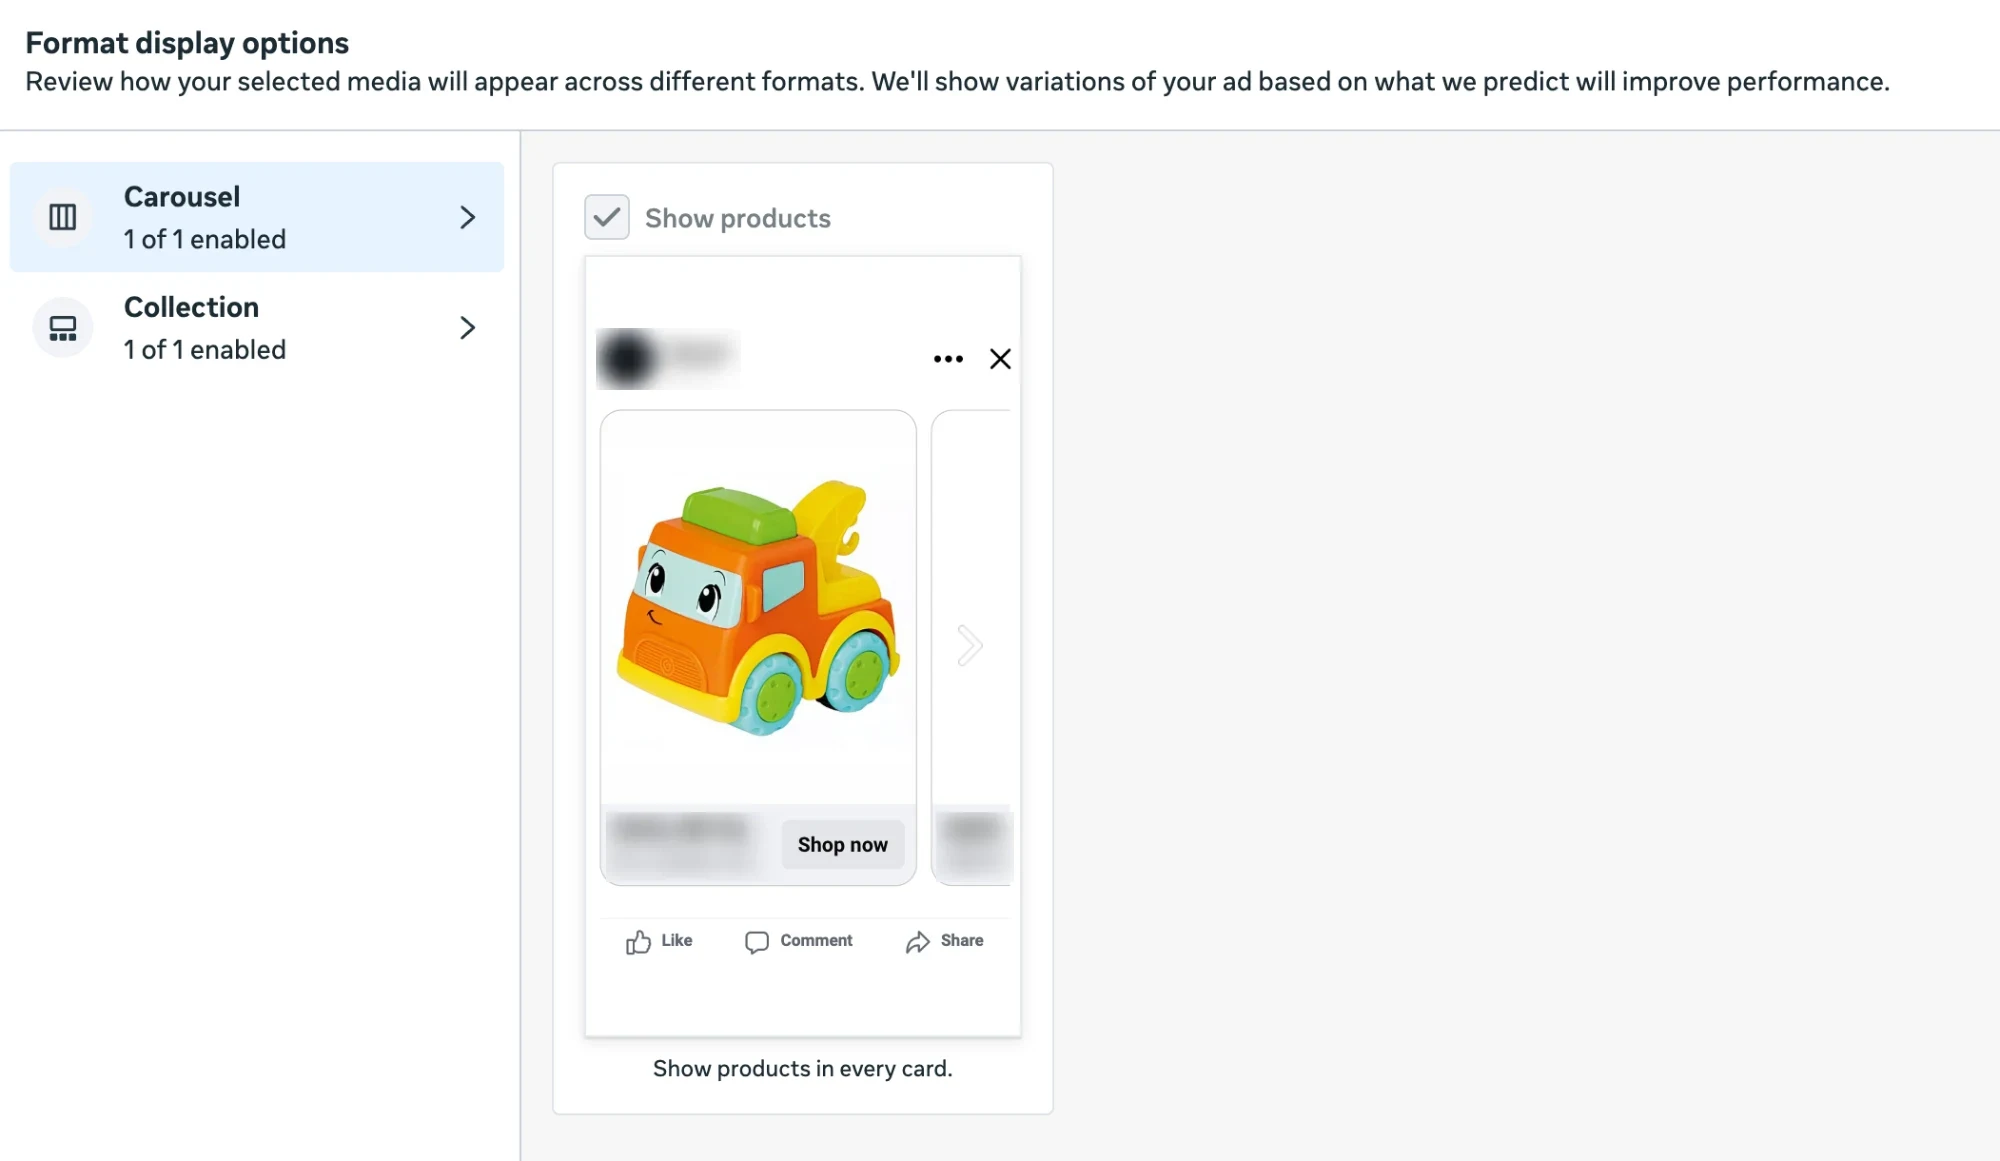
In the ad, open Format display options and tick Show products for the formats you allow, carousel or collection, so Meta fills every card with products from your catalog:
This comparison helps you choose between the formats.
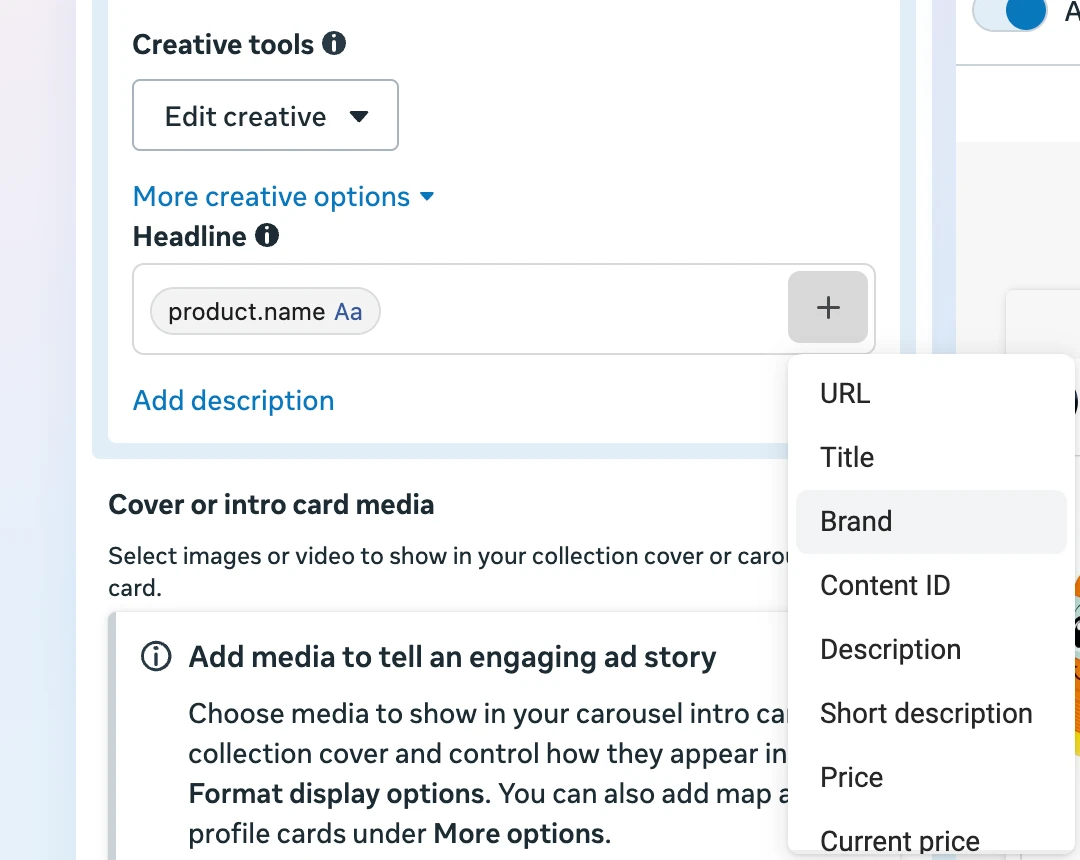
The ad text can change with the product. Meta's developer documentation shows the fields as placeholders such as {{product.name}} and {{product.price}}. In Ads Manager you insert them into the primary text, headline or description with the + next to the field, so one line of copy works for every product:
Then look at the images. Unless you change something, every ad uses the image_link photo from your feed, which for most stores is a product on a white background.
You have three ways to change that. Meta's frames and overlays add a border or the price on top of the photo. You can also put a different image per product into the feed, or generate a new creative for every product.
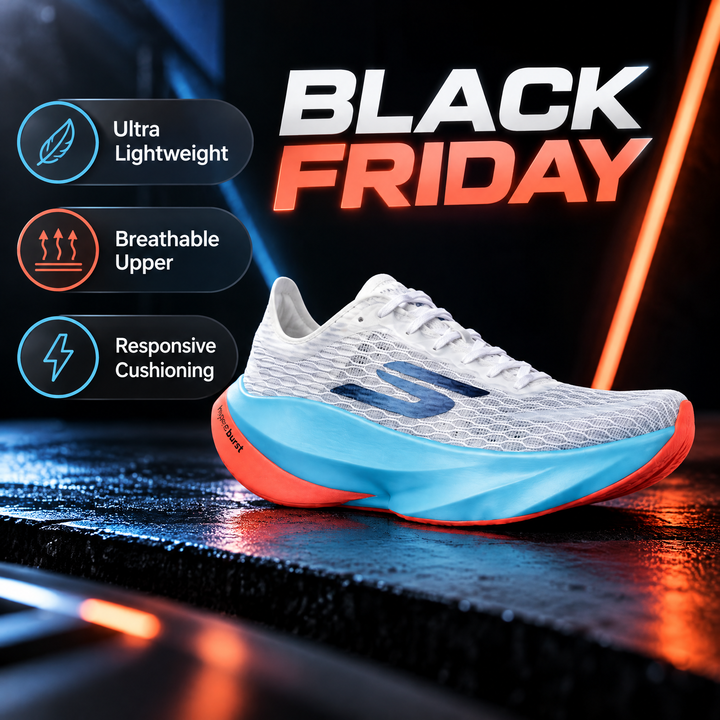
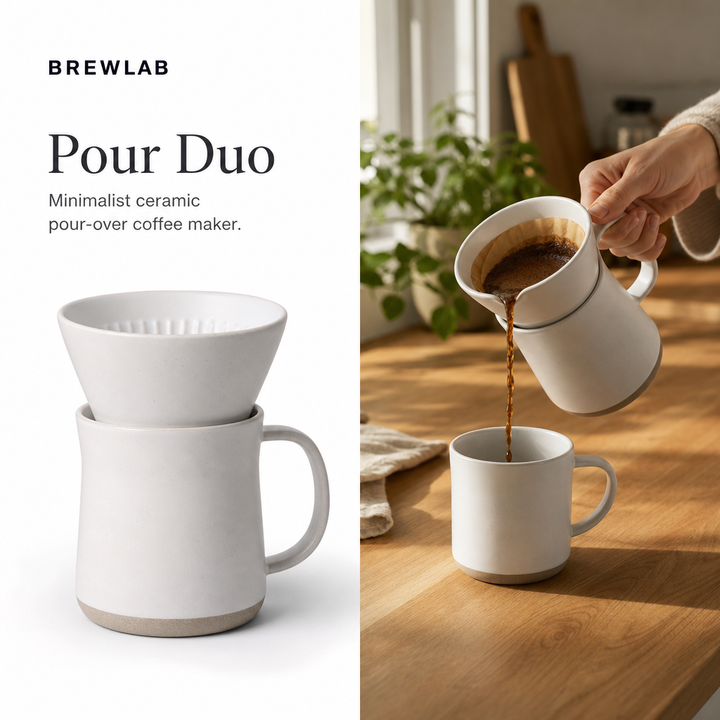
These examples from the OptiQube ad library each started as a plain product photo in a store's feed:

- Callout: labels pointing at what the photo can't show, here the insulation and the six-can capacity of a foldable cooler bag.
- Badge: a Black Friday headline and three benefit badges next to a running shoe.
- Lifestyle: a clean product shot on one side, the coffee maker in use on a kitchen counter on the other.
Image specs for catalog ads
The feed image is the baseline, and you can add more per product. These are the rules from Meta's documentation:
| Image | What Meta says |
|---|---|
Feed image (image_link) | JPEG or PNG, at least 500 × 500 pixels, up to 8 MB |
| Extra 4:5 image | Tagged in the feed and used where the placement can show 4:5 |
| Extra 9:16 image | Tagged in the feed and used in 9:16 placements such as Stories and Reels |
| Everything else | The default feed image |
Square (1:1) is the safe default, because it fits every placement. If your feed only holds square packshots, the ads still run everywhere; a 4:5 or 9:16 version simply fills more of the screen where Meta can show it.
Common setup problems
- Low match rate. The pixel and the catalog use different IDs (see step 4).
- Rejected items. A required field is missing or wrongly formatted, most often the price, the brand or the image size.
- Out-of-stock products in ads. The feed doesn't update often enough. Meta's FAQ says products marked out of stock "automatically stop serving", so schedule the feed at least daily.
- An empty product set. The filters exclude every item, so the ad has nothing to show.
- Wrong currency format. A symbol such as
$instead of the code, or a comma as the decimal separator. - Links on another domain. Meta expects the product link on your own website's domain.
Frequently asked questions
Can I create a catalog before setting up the Meta Pixel?
Yes. You can create a catalog in Commerce Manager and add products before any pixel exists. To retarget people with the products they viewed, and to check your match rate, you then connect the Meta Pixel or the Conversions API to the catalog, and the product IDs your events send must match the IDs in the feed.
Do I need both the Meta Pixel and the Conversions API?
You need at least one of them. Meta recommends running the Conversions API alongside the pixel for better ad performance. When you send the same event through both, give them the same event name and event ID, so Meta counts it once instead of twice.
How do I connect my Shopify products to Facebook?
Install Meta's Facebook & Instagram app from the Shopify App Store. It syncs your eligible products to a Meta catalog and sets up the pixel. In the app's data sharing settings, the Enhanced and Maximum levels also send events through the Conversions API.
Why is my catalog match rate low?
Usually your events send a different ID than the catalog holds, for example a SKU in the pixel and a variant ID in the feed. Check one product page: the content ID in its ViewContent event should be exactly the id of that product in your catalog.
Why are my catalog ads showing out-of-stock products?
Usually the feed is out of date. According to Meta's catalog ads FAQ, products marked out of stock in the catalog automatically stop serving, so the fix is fresher data: schedule your feed to update at least daily, or use a platform integration that syncs availability.
Can catalog ads reach new customers, or only retarget?
Both. The same catalog can show products to people who already viewed them and to people who have never visited your store, based on what Meta predicts they will like. Meta's sales campaigns now handle both audiences once the catalog is connected.
What image size do catalog ads need?
Meta's catalog specification asks for JPEG or PNG images of at least 500 × 500 pixels and up to 8 MB. Square images work across most placements, and you can add extra 4:5 and 9:16 images per product for feed and Stories placements.
What is a Facebook catalog?
A Facebook catalog, now a Meta catalog, is the list of products Meta can advertise for you: each item with its ID, title, description, price, availability, condition, brand, link and image. You manage it in Commerce Manager and fill it from a feed file, a scheduled feed URL, a platform such as Shopify or by hand.
Next: the creative
Once the catalog, the pixel and the campaign work, Meta picks the audience, the placements and the products. What it can't pick for you is how those products look in the ad.
Browse 250+ catalog ad examples in the ad library to see generated catalog creative, or start for free. OptiQube, our product, reads your feed, generates a creative for every product and sends the approved ones to Meta as a paused campaign draft.